WordPress has an automatic built-in navigation structure that creates your menus for you. It includes pages and categories. It will place them in your primary menu without you having to do anything other than create the page or a post within the category. This works great if you only have a few page and categories, but after a while it can start to get out of hand. Also, just because it can handle your navigation automatically doesn’t mean you should let it.
WordPress will handle you menus for you automatically without any input from you, but if you really want to take full advantage of your menu structure you can create your own custom menus. Custom menus allow you to take full control over your navigation structure and can give your site a cleaner and more professional look.
Type of Menus
There are several different types of menus. The menu types you can use depend on the features of your theme. Popular menu types include:
- Primary Menu – this one appears below the header. It should include your main navigation and pages that your visitors expect based on the type of website you have: home, about, contact, blog, portfolio, etc.
- Secondary Menu – this one appears above the header. This should include links and pages that you want to give your readers in a convenient location but not necessarily in your main navigation structure. This can be items like tutorials, a shopping cart, etc.
- Sidebar – your custom menus can be placed in the sidebar using the custom menu widget. You can use as many widgets as you want and place any menu in them.
- Footer – you can create a menu just for your footer. This menu usually has less information in it that your primary menu. Depending on the needs of your site, it usually contains home, about, contact, blog, etc. If you site includes job postings, an affiliate program, and sister sites they could be included here as well.
- Social Links Menu – this is a special menu that’s found in themes such as Twenty Fifteen that places your social media links in your sidebar. If the theme recognizes the social network it will provide the proper icon. If not then it will show the names as text (according to how you’ve labeled the link).
The primary and secondary menus are the most popular among WordPress themes. What goes in them really depends on the focus of your site. The primary focus of your site should appear in the primary menu. It should make sense to your visitors and be what they expect to see.
For example, if you have a store then your shopping cart should be in the primary menu. If you have a portfolio site but you also sell some things, then your portfolio should be in your primary menu and the shopping cart should be in the secondary menu. Just think about where it fits logically and place it accordingly.
Creating Your Own Custom Menus
WordPress makes it easy to create your own custom menus by hand. You can create, adjust, and apply menus from the back end, and you can select your menus from the front end to see them and test them out before going live.
Creating the Menus from the Back End
On the back end, go to Appearance and select Menus. On the front end go to Customize and select Navigation.
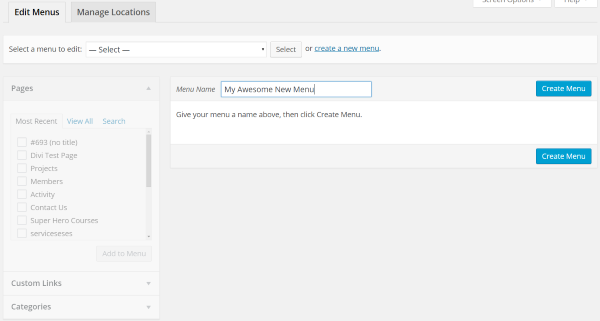
On the menu screen select create a new menu, give the menu a name, and click the Create Menu button.
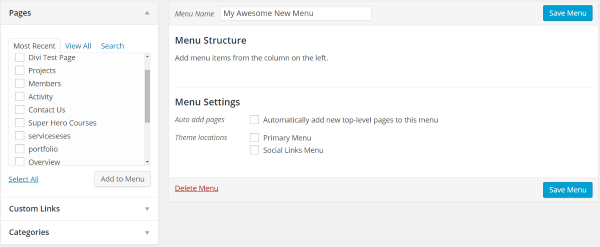
Now you’re ready to start adding the navigation structure. On the left you have boxes for Pages, Custom Links, and Categories. You can use all of these as links in your custom menu. In the middle you have some options. You can allow all new pages to be automatically added to the menu structure or leave this unchecked if you want to have more control and choose the pages and categories yourself.
Pages
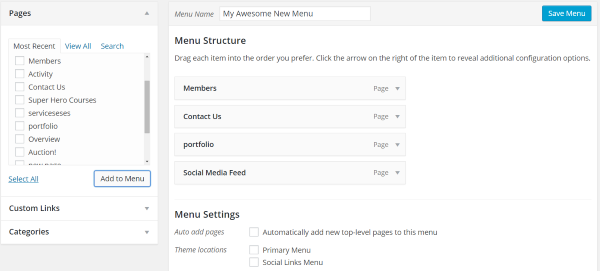
Select the Pages tab in the left window if it’s not already open. To add pages to the menu, select all the pages you want and click Add to Menu.

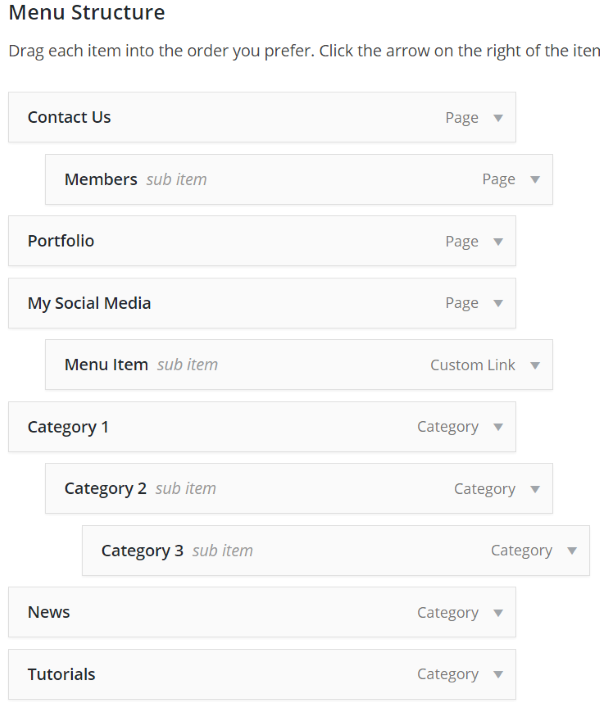
If you want them arranged differently just drag and drop the menu item you want to move into its new location. You can even make it a sub-item of another menu item by dragging and dropping it to the right under the item you want it to be a sub-item of.
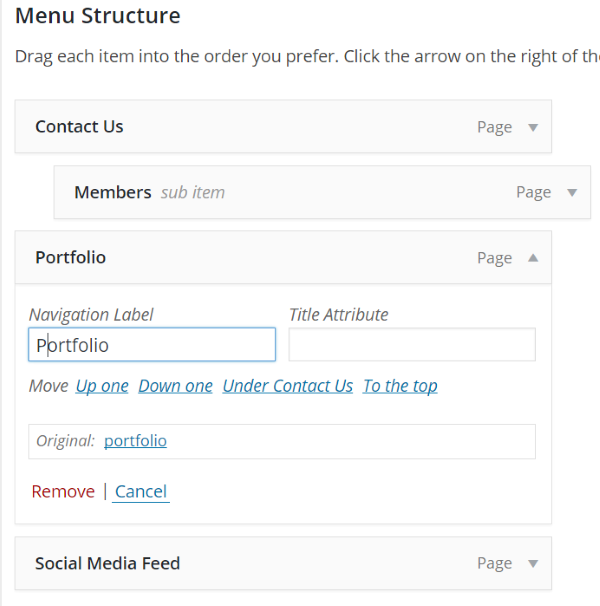
You can select the arrow on the right to open the item and make adjustments such changing the name and location. You can also remove the item from the menu structure here.
Custom Links
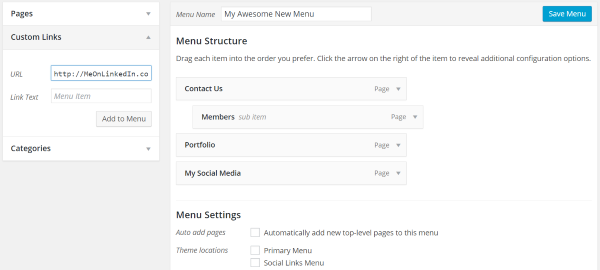
To add custom links, open Custom Links in the left window, add the URL you want, and select Add to Menu. You can create any kind of link you want and have them be part of your menu structure. This is also how you create links for the Social Links menu.
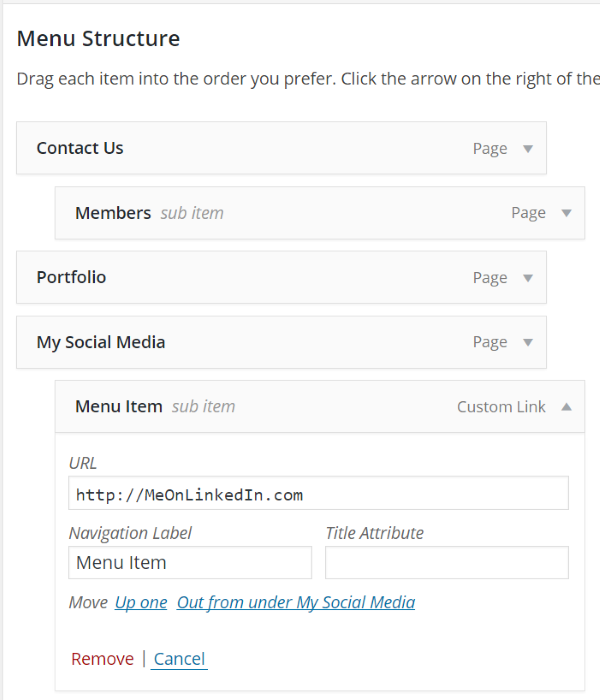
You can then drag and drop it where you want in the menu structure.
Categories
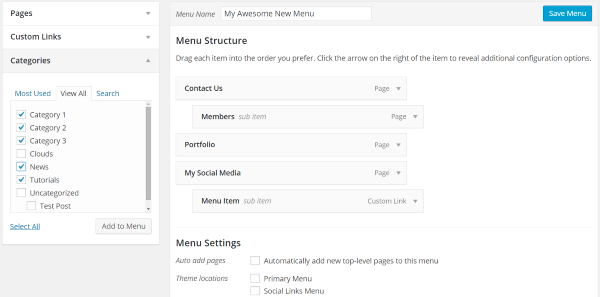
You choose and add categories the same way you choose and add Pages in the left window. They will act the same way pages and links do in the menu.
Save Your Menu
Once you like your new menu structure save it and then you can use it.
Manage Locations
There are two ways to use your menu from the back end.
Menu Settings
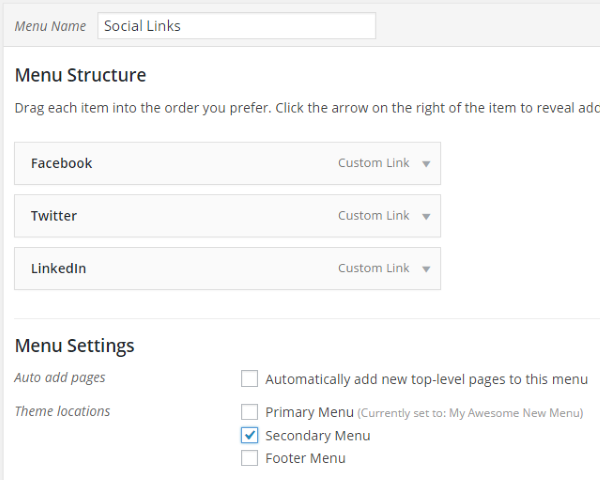
On the screen where you created the menu there is a group of check boxes under Menu Settings. You can select any menu and then select where it is to be used. You can select as many as you want. Don’t forget to save it.
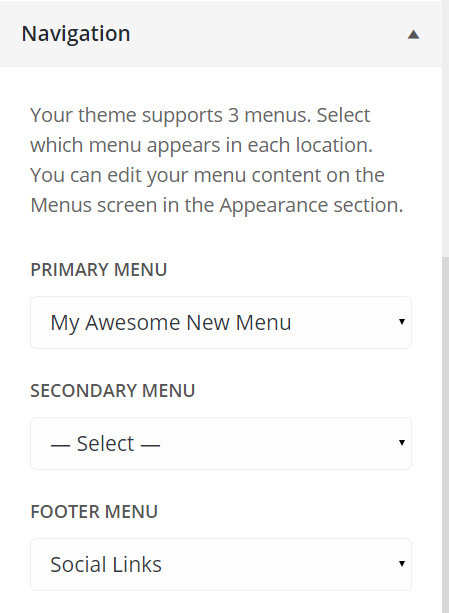
Manage Locations
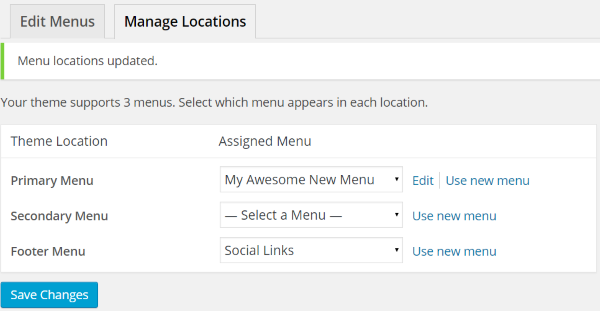
Select the Manage Locations tab. Here you can choose which menu to use where in the drop-down boxes. You don’t have to use them all. One you’ve chosen which of your menus will be used where just hit save and you’ve just updated your menu structure.
Widget
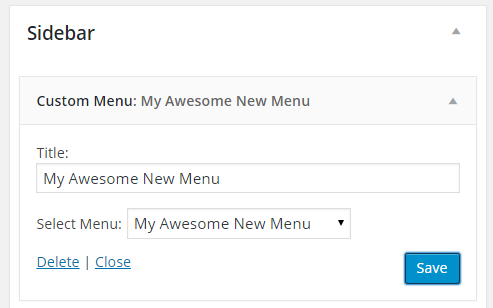
WordPress also has a Custom Menu widget that you can drag and drop into your sidebars. From here you can select your menu.
Testing
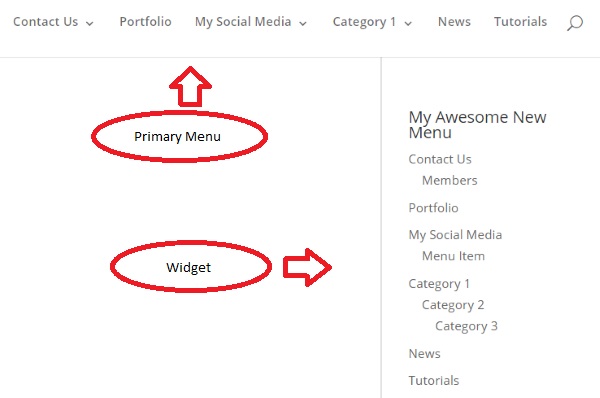
Here’s a look at my test menu and sidebar widget. The next thing to do is test each item to make sure it works smoothly and intuitively. Don’t forget this step. It’s very important to test your menu to see if it works the way you intended. Obviously these are not menu titles you should use on your website.
Using the Front End for a WYSIWYG View
To modify your menu structure from the front end, go to Appearance and select Customize. Once you get to the front end, choose Navigation. From here you can choose your menus. The advantage of this view is you can see the changes immediately before saving them. This way you can decide if you like it before committing. Unfortunately this system won’t let you create them.
Customize the Look and Feel with Themes Like Divi
Some theme’s, such as Elegant Theme’s Divi 2.4, give you tools so you can make adjustments to the look and feel of your menus from the front end and see their affects immediately. This way you will know what your visitors will see before you save it.
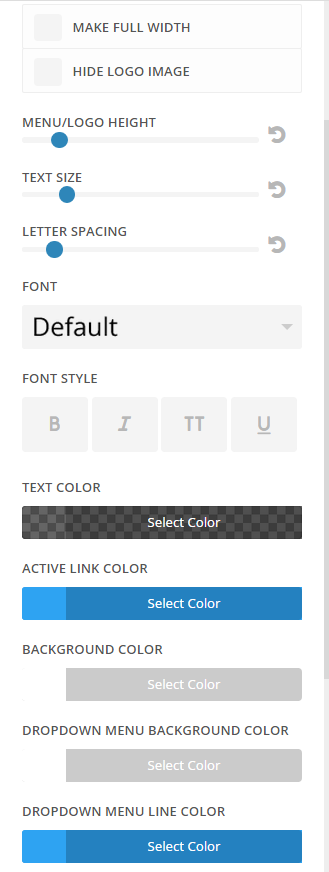
Here’s a look at Divi’s menu adjustments. You can make these same adjustments to change the look and feel for each menu item.
Customizing Even Further – Using Plugins to Modify Your Menus
There are a lot of plugins available for WordPress that help you modify your custom menus with new features, looks, and functionality. They add lots of CSS adjustments, make them responsive, and even make them faster. Here’s a look at a few of the more popular plugins.
Custom Menu Wizard Widget
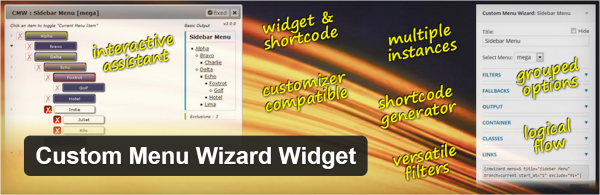
This free plugin adds a custom menu widget that you can use in your sidebars or in your content by using shortcodes. It gives you full control over your menu parameters and lets you use specific portions of your custom menus. It also adds some custom classes.
You can display specific portions of the menu or the entire menu. You can also make the output conditional. It will display as flat or as hierarchical according to the number of levels that you specify. You can also modify the output with HTML.
The settings for the widget are easy to use. You choose the menu from a drop-down box and select filters, fallbacks, output, container, classes, links, and alternative (this is another level of conditions). It also gives you a shortcode so you can paste your menus into your content.
Nextend Accordion Menu
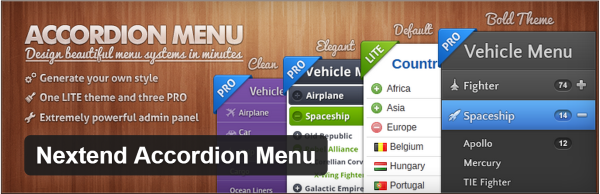
This plugin lets you create accordion style menus with complete control over menu levels, colors, animation, etc., each with their own settings and skins. You have control over the levels and states of fonts, backgrounds, colors, images, etc. It speeds up the menu system by using cache, provides various types of animation, has unlimited levels of menus, and provides 30 settings.
I like the way the accordion menus work. You can expand them when you want to use them and then hide them to give you a cleaner layout when you don’t want to see them on screen. The plugin is easy to use and set up. You create menus just like you would custom content types. You can then drag the widget into your sidebars and choose the menu from within the widget.
There is also a Pro edition that adds three themes and support. Prices start at $29.
Responsive Menu

This free plugin has 70 options to adjust how your menus look, feel, and act. You can adjust the titles, CSS, actions, sizes, animation, scripts, and lots more. It works great for mobile devices and has features to pull the menu from one side and set the menu’s location. It will even minify your menu’s CSS and JavaScript. You can also add custom HTML and import/export your settings.
There are a lot of adjustments in the settings but they’re all simple to understand and adjust. There’s also an advanced level of settings but you can ignore them if you want. It includes shortcodes and you can even add the PHP code to your theme if you prefer.
Other Plugins to Modify Menus
Here is a list of other plugins that I found interesting. They add or modify the features of your menus and let you control them in various ways.
- WordPress Mega Menu
- CSS3 Mega Drop Down Menu
- WP Responsive Menu
- Font Awesome 4 Menus
- Shortcodes in Menus
- Faster Appearance – Menus
- Food and Drink Menu
- Simple Retail Menus
- Purify WordPress Menus
- Widget Menuizer
Tips for Creating Great Menu Structures
- Use your menus to keep your navigation structure organized.
- Use as few levels as you can get by with. Think in terms of Primary and Secondary.
- Use names that make sense to readers without them having to decipher your code.
- Use the K.I.S.S. method. Remember – simpler is better. Menus should be easy to use and intuitive.
- Check the menu structures of your favorite sites and see what you like and what you don’t like. Then make yours better.
Final Thoughts
Adding your own custom menu structure is easy and will make your WordPress site look and feel more professional and will keep your structure from looking random. It only takes a few minutes to create your very own set of menus and you can see them and try them out before going live. Your visitors will appreciate a menu structure that lets them navigate your site more quickly and intuitively.
Your turn! Have you created your own custom menu structure? Do you have anything to add? Do you use plugins to modify your menus? Tell us about it in the comments below.