Thank you for choosing to use the Manta theme. This documentation will guide you through the installation, usage, configuration and customization options of the theme.
How to Install Manta
There are two ways to install the Manta theme: directly from the Themes Directory from within your WordPress dashboard, or manually uploading the compressed (zip) theme file.
Install from the Theme Directory
- Log in to your WordPress website
- Go to Appearance > Themes and click Add New
- In the Search themes box, type “Manta” and locate the theme in the search results
- Hover over the theme then Click Install
- Once it is installed, click Activate
Manually upload the theme zip file
- Download the theme zip file from WordPress.org
- In your WordPress dashboard go to Appearance > Themes and click Add New
- Click Upload Theme
- Click Choose File and located the theme zip file you just downloaded, then click Install Now
- Once it’s installed, click Activate
Get to Know WordPress
WordPress is a fantastic web publishing platform. However it can be a bit tricky at first. There’s a lot to learn. If you’re new to WordPress head over to the official Getting Started with WordPress guide – it’s a great resource for learning how to use WordPress.
Using the Manta Theme
The information below will help you use the features included in the Manta theme.
Homepage Featured Posts
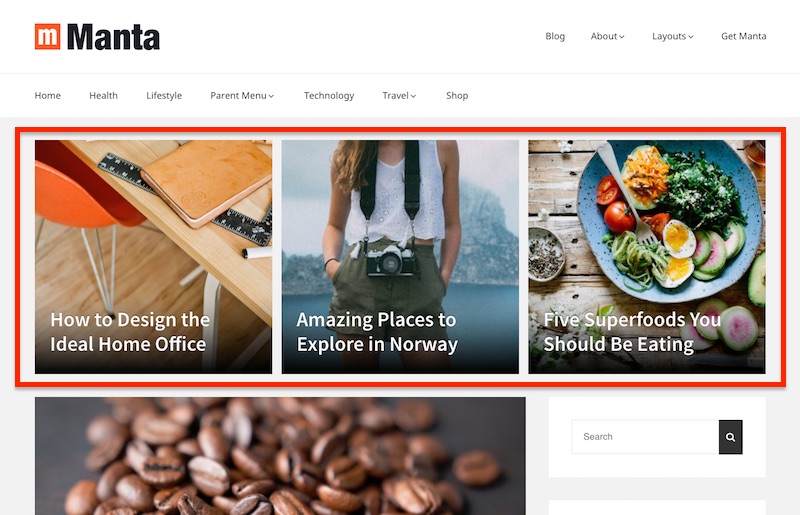
Manta has the option of displaying featured posts on the homepage. You can display one, two, or three features posts depending on your requirements. Featured posts are displayed utilizing the native WordPress ‘Sticky Posts’ functionality.
To add a featured post to the homepage you need to make the selected post(s) ‘sticky’. You can do this two ways.
In Edit Post
In the Publish panel under Visibility, cleck edit to see the checkbox and select “Stick this post to the front page“.
In All Posts View
- Go to Appearance > Posts > All Posts
- Hover over any post you want to display as featured post.
- Click on ‘Quick Edit‘ link
- Click on checkbox stating ‘Make this post sticky‘
- Click on ‘Update‘ button to save changes.
- Make sure a featured image is set for the post.
Customizing Manta
All of the options for Manta are built right into the native WordPress Customizer. To start customizing the appearance and style of your site, navigate to Appearance -> Customize.
The Customizer options are shown side-by-side with a live preview of your website, allowing you can test the effect of changes in real time. To make changes, all you have to do is select each of the available options and edit their settings.
Once you’ve made the changes you want, you must click the Save & Publish button. Until you click Save and Publish, none of the changes are shown on the live website. This means you can experiment with making changes without your visitors seeing on the live website.
WARNING
DO NOT edit the theme files directly. You will lose all modifications when the theme is next updated if you do so.
Please use a child theme. Alternatively for minor CSS customization consider using the Additional CSS section in
Appearance > Customize > Additional CSS, as this is saved in your database and will remain after theme update.
Colors
Manta provides various options to customize the colors of several theme elements.
- Background Color: You can set a custom background color that will typically display behind the content area of your site. Note: In some cases, the Background Color can be set here but it won’t show on the site if a Background Image is also being used since the background color is located “behind” the background image.
- Site Title Color: This option will change color of your site title.
- Body Text Color: This option will change color of post content, header and footer menu items, site description, page navigation etc.
- Link Color: Change color of links except header & footer menus, site and post titles, pagination and navigation links.
- Link Hover Color: Change hover color of site links except site and post title links.
- Post Title Color: Change color of Post/Page titles (both linked and non linked)
- Post Title Hover Color: Change hover color of post titles.
Typography
Options to change theme typography.
- Body Font Family: Choose a Google font for the body text font (everything except HTML heading i.e., H1, H2 etc.)
- Heading Font Family: Change Google font family of HTML heading and site title (heading or not).
- Mobile Base Font Size: Base font size is the font size of the main content text of your site. Size of all other site elements will change proportionately. This option will change font sizes for mobile and tablet screen size only (when the screen size is less than or equals to 1024px).
- Desktop Base Font Size: This option will change font sizes for Desktop and Laptop screen size only (when the screen size is greater than 1024px).
- Base Line Height: Line height is a very important part in theme typography, it is an important factor in maintaining site’s vertical rhythm. You can change overall theme line height with this options. However, Line height of some of the components like, Blockquote etc. will remain unchanged with this option.
Layout
Options to change theme layout.
- Overall Site Layout: You can choose either a full width or boxed layout for the overall site.
- Header Items Alignments: You can right, left or center align you header components like, Site branding (logo, title and description), Header menu and Header widgets. Center layout will vertically stack all items on one another. Default layout will be left aligned.
- Main Menu Alignment: You can align the main menu items to the right, left or center with this option.
- Footer Items Alignment : You can right, left or center align you footer components like, Footer menu, Copyright text and Theme credit. Default layout will be center aligned. Copyright text and theme credit will always stacked on one another irrespective of option selected.
- Make Main Menu Sticky On Scroll: You can choose to make main menu stick to the top of the screen as you scroll down the page (Main menu will stick on upper edge of browser content area on scroll). By default main menu will be sticky on scroll.
- Thumbnail Display Option: Various sites have different requirements for thumbnail layout display. With this option you can customize how featured images should be displayed on archive or index pages. You should use Regenerate Thumbnails WordPress plugin to properly resize all previously uploaded featured images(uploaded before Manta theme was active). All image sizes and displays are self explanatory, however, smaller thumbnails will become full width large thumbnails on mobile/Tablet screen sizes, ensure using larger (minimum 640px wide) images for smaller thumbnails, so that they look good on all screen sizes
- Global Content Layout: Change overall content sidebar layout for your site.
- Available layout options will be as per active sidebar widget areas.
- If both primary and secondary sidebar are not active(do not have any widget to display), only two options i.e., Overall Content(No Sidebar) and Overall content Full width will be visible.
- If primary sidebar is active(have at least one widget assigned to it), Additional, Content-sidebar and Sidebar-Content option will become available.
- If both primary and secondary sidebars are active, then three additional options namely, Content-Sidebar-Sidebar, Sidebar-Sidebar-Content, Sidebar-Content-Sidebar will be available. Note: Both primary and secondary sidebar must be active in order to display secondary sidebar. Active secondary sidebar will not be visible if Primary sidebar is not active.
- If no options selected, default layout options are, “Full width (No sidebar)” if no sidebar is active. “Content-Sidebar” if Primary Sidebar is active. “Sidebar-Content-Sidebar” if both primary and secondary sidebar are active.
- Different Layout for Posts / Pages: You can choose to have separate layouts for (index/archive/search) and Single posts and Single pages. To do this, click on Different layout for posts/pages. Immediately you will see two additional options to choose separate layout options for single post and page. By default they will be same as Global layout.
- You can choose to have different layouts for one individual post/page. On post edit screen, you will see layout options in right sidebar. Choose an appropriate layout. However, Different layout for posts/pages option must be checked. Otherwise global layout will be visible irrespective of option selected.
Dimensions
Change the overall site width, primary sidebar and secondary width.
- Overall Site Width: This option will change overall site width. Note: Overall site width will fallback to theme default site width if device screen size is less than chosen overall site width. Click on Reset icon to reset overall site width to theme default.
- Primary Sidebar Width: this will change the width of the primary sidebar. Main content width will be automatically adjusted to accommodate changed primary sidebar width. Obviously, this option will only work if primary sidebar is active.
- Secondary Sidebar Width: this will change the width of the secondary sidebar. The Main content width will be automatically adjusted to accommodate changed secondary sidebar width. Obviously, this option will only work if secondary sidebar is active.
- NOTE: Site widths are only applicable for desktop/laptop screen sizes (Screen size greater than 1024px)
Blog
Blog specific customization options,
- Excerpt or Full Content: You can switch between displaying post excerpt or full content on Home or Archive pages by choosing “Excerpt Or Full Content”. Note: if you have used More tag for individual post,
- Only excerpt up to 40 (or up to customized excerpt length) will be visible. ‘Excerpt’ customizer option will supersede the more tag.
- More tag will supersede ‘Full Content’ option. It means if ‘Full Content’ customizer option is selected and more tag is used for individual post, excerpt up to more tag will be shown.
- If there is no more tag for a post, ‘Full Content’ or ‘Excerpt’ will be shown on home or archive page, based on customizer option selected.
- Excerpt Length: The “Excerpt Length” customizer option allows you to change the number of words to be shown as post excerpt on home, archive or search pages. Obviously, this option will not work if “Full Content” option is selected.
- Change Excerpt Read More Text: The options allows you to customize the read more text when displaying excerpts.
- Display Thumbnail Image on Single Posts: this option allows you to show or hide featured image on individual single posts and with “Full Content” display on home or archive pages.
Copyright
Customize site specific Copyright text.
- You can change Copyright text using this option. This option will not take HTML characters. To write ‘©’ symbol just copy and paste this symbol in Copyright textbox.
- You can write multiple lines or paragraphs in this text box.